Awesome Abs — Stage 1
12 Weeks to Astounding Abdominals
by Ian King
In the last few years, Ian King has given us several 12 week
specialization programs for almost every major muscle group. Now, for
the first time, Ian has provided
Testosterone with a four stage
ab training program designed to prevent injuries, improve athletic
performance and, last but not least, make you look great with your
shirt off. This is the first stage of that 12 week program.
What follows is an example of a four stage abdominal program. As with all my prior programs published on
T-mag,this is a generalized program. I didn't used to provide generalized
programs because my focus was on customizing training based on
individual needs. I still believe in the power of individualization,
but I also realize that for many, a generalized program is far better
than what they're already doing in the gym. Plus, there's much to be
learned by following a pre-made program and a person can later modify
it to meet his personal needs. In my [url=javascript:void(0);]overview[/url] of abdominal training published previously in
T-mag,I covered a lot of ground. I strongly recommend you read this article
if you haven't done so, or read it again to refresh your memory. That
way I won't have to repeat myself too much here and you'll have a good
idea of where I'm coming from. Generally speaking, this program prioritizes the potential benefits of abdominal training in the following order:
1) Injury prevention 2) Transference to sport 3) Visual impact
I
feel the primary purpose of ab training is to contribute to the health
of the lower back, hips, and lower extremities. I placed sport
transference second because of the general transference this program
may have. There's no attempt to be sport specific or hyper-specific in
the program. The reason I placed visual impact last is because of the
role played by body fat. Obviously, visual impact will be lessened if
you're overly fat because of poor dietary choices or other factors.
(And by the way, I know of at least one highly promoted abdominal
"washboard" where the owner of said washboard omits to share with his
audience the role of liposuction in his development!)
Anticipated QuestionsBefore we get into the details, I'll expand on the following anticipated questions:How many weeks should I stay on this program? As
with all the programs I write, you need to be the judge on this, but
probably somewhere between two and four weeks per stage. The average
person would probably benefit from doing each stage for three weeks,
thus the "12 Weeks to Astounding Abdominals" subtitle (four stages of
three weeks), but you decide. How do you decide? If you cease
to improve week to week, you're either going too hard or have been on
the program too long. Solution? Either switch to the next stage or
review your training load (volume and intensity). Ideally, you make the
switch before you see much, if any, residual fatigue which could damage
your work capacity or performance.When should I do these ab exercises?You
can do them as either part of the regular training session or separate
from it at another time in the day. It's your call. In this first
stage, if you're going to do them with the regular training session,
I'm going to recommend you do them
before the weight workout. Now,
as I like educated trainees and I like them to have an input in this
decision, you can override the above if you wish. But if you've done
less than 50% of your training history with abs first in the workout,
then I'd recommend doing as I suggest. I suspect the majority of the
world's strength-training population would be doing them first in this
case. The only other reason for not doing them first would be
if your abdominal strength was in excess of the strength of the rest of
your body; not in absolute terms, of course, but relatively speaking.
Here's a quick test: Lie on your back on the ground. Bend your knees
until your feet are flat on the ground. Don't hook or anchor your feet
under anything. Touch your hands on opposite shoulders. Slowly, taking
five seconds at a constant pace, sit up until your elbows touch your
knees. No jerking movements or arm or head throwing allowed, and your
feet aren't to come off the ground. If you can't do this — and I don't
expect many will initially be able to do so — you need to hit the abs
first!

Can I change the order of the exercises?Sure,
provided you have an objective rationale for doing do. I've based the
program on loose assumptions about the trainee, including that most
peoples' "lower" abs will be less advanced than their upper abs. This
isn't always the case. If you understand which abdominal sub-groups the
exercises are intended to target and have a rational belief that your
needs differ from the suggested sequence, you may change the order.
Generally speaking, work from weakest to strongest in this phase.Can I change the volume?Yes,
but do you need to? I don't hesitate to say that this program is a
generalization and therefore it's impossible for it to suit all.
However, before you go and play with the variables, have a good hard
think about the reasons driving you. Depending on what you're using
abdominal training to achieve, I feel that volume higher than that
provided isn't needed.For most of you, just do one set per
exercise in stage one. For those who feel for whatever reason they want
to do more volume, consider a second set on all or some of the
exercises.Can I change the reps?Again, sure. But again,
do you need to? Review your driving force. Is it rational and
objective? Have you given the parameters provided in this program an
adequate and objective trial?Can I change the training method?The
method recommended is basically a standard-set approach — work set,
rest, work set, rest, etc. If you wanted to (and this is more
applicable to those doing two sets on some or all of the exercises) you
could use a circuit approach where you do one set of all exercises
without resting between exercises, then rest one to two minutes and
repeat the circuit. For whatever purpose getting a muscle "burn" will
do for your body, you'll get it using this method!Can I use something besides a four-day split?Sure!
You'll just need to modify it to suit. In this model program, I've used
an A/B rotating program. That is, I have you doing A and B twice in the
training week on an alternating approach. If you're training only three
days a week, you could go A-B-A one week, B-A-B the next etc. If you
were only training two days, just use the A and B program in the week.
Enough talk. Let's do it!
STAGE 1
Weeks 1-3
A — Days 1 and 3 (Mon/Thurs)
After a general warm-up and stretching, perform the following:Thin tummy variations
Sets: 1-2 x 10 Speed: 5 second holds Rest: 0-30 seconds
Toes to sky
Sets: 1-2 x 10 Speed: 5 second holds Rest: 0-30 seconds
Side raises on ground
Sets: 1-2 x 10-20 Speed: 313 Rest: 0-30 seconds
Side lying trunk and leg raises
Sets: 1-2 x 5-10 Speed: 313 or 3-5 second holds Rest: 0-30 seconds
Seated thin tummy/squeeze cheeks
Sets: 1 x 5-10 Speed: 5 second holds Rest: 0-30 seconds
*See our FAQ section if you aren't familiar with tempo prescriptions like "313".
Here's a description of the exercises involved in A day, stage one:Thin Tummy VariationsThe
thin tummy drill is the cornerstone upon which I build my abdominal
programs, yet it's one of the hardest to teach. I've seen this drill
done in the kneeling position, but I have a preference for doing it on
your back. Furthermore, use a few original and unique teaching points. Lie
on your back, knees bent to 90-degrees, feet flat. Place both hands
under your belt line with your fingers heading down into the pubic area
and the thumbs placed higher up on the rectus abdominus (upper
abdominal region). Throughout all the following levels of difficulty,
use the fingers to provide feedback that the "lower" abs (obliques and
transverse abdominus) are contracted — pulling the lower tummy thinner
and creating a high level of tension under the skin — and that the
upper ab region is hollowed and non-contracted.

Should
this position at any time change or you feel that it's going to change
(e.g. upper tummy bulges, pelvis anteriorly rotates), terminate the
range or the set. I focus more on how the muscles are "set" than on the
pressure of the lumbar to the ground or position of the pelvis,
although both are symptomatic of a good set position.Initially,
you may struggle to even find the muscles I want you to contract! Work
with five second holds, ten reps a set. The next step is to be able to
breath normally during the isometric contractions!I have at
least five levels of difficulty that I teach and this simple isometric
contraction is level one. In stage one of this program you should be
happy to master the first level and maybe progress to level two.
Level 1: Isometric holds (looking for above "set" position) in the lying, knee bent positions.
Level 2: As above, but lift one leg up, lower it, reset, repeat with other leg, etc.
Level 3: As above, but when you lift one leg up, extend it out as far as set position allows.
Level 4:As above, but start with both knees up, bent to 90 degrees knees and
hips, cycling one leg at a time out towards a parallel to ground
position as far as set position allows.
Level 5: As above, but extending both legs out together.
Notes:Speed of movement — Isometric holds for 5.
Selecting
appropriate level — The only way to really know what level of
difficulty is appropriate is to perform a rep or two at each level,
starting from the least difficult, until you're being challenged. Don't
continue on looking for failure; work with a level that's manageable.
In this exercise you really need to learn to feel when you lose the set
position. This goes for most exercises in this program.
Toes to SkyThis
exercise is a bit easier to teach. Lie on your back, arms out on the
ground at 90 degrees to the trunk, have your legs together, 90 degrees
hip flexion, so that legs are vertical.

I identify at least three levels of difficulty in this drill, but I don't expect you to go beyond level 1 in stage one.
Level 1:Lift the pelvis as far off the ground as possible whilst maintaining a
totally vertical leg position (initially this may not be very far at
all) and hold for 5-10 seconds.
Level 2: As above, but bend one knee to 90 degrees; alternating on each rep which leg is bent and which is straight.
Level 3: As above, but bend both legs so that the knees are at 90 degrees.
NotesSpeed
of movement — A controlled lift, a steady hold for 5-10 seconds, no use
of momentum, keeping legs (or upper leg at least) always totally
vertical.
Side Raises on GroundThis
is my basic exercise for developing lateral trunk flexion. Whilst it
can be argued that the position and action isn't totally isolated to
flexion in the horizontal plane, it's a low level exercise appropriate
for the first quality of strength — control and stability. Lie
on your back, knees together and bent to about 90 degrees. Roll the
knees over together so that they're on the ground, with the shoulders
and upper back still parallel to the ground. Now flex the trunk,
basically up towards the roof or sky. I like to have the fingers
lightly touching the front of the head, elbows out at 45 degrees from
the body and arm/elbow angle not changing during the lift. The
placement of the hands will alter the level of difficulty. The further
the hands are above the head, the harder the movement.
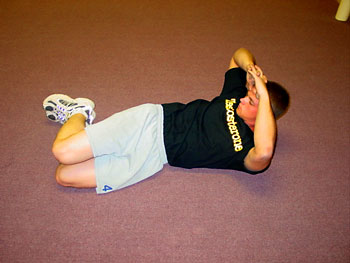
Side
lying trunk and leg raises: This is an additional lateral flexion
exercise, one that includes both trunk and hip/thigh lateral flexion.
Lie on your side with your hands straight out behind your head in line
with your body and legs straight. You must start on your side and stay
on our side. You can lock your hands together if you want. Now
simultaneously raise your arms and your legs so that neither are in
contact with the ground.


 NotesSpeed of movement — You have a choice of a 3-5 second hold in the top position or a controlled movement of 313.
  Notes
Notes Control progressionsLevel 1: Cheat up/slow downLevel 2: Cheat up/slow down + isometric stops during lower (pause on the way down)Level 3: Reverse curl downs (See below)Level 4: Slow up/slow downLevel 5: Slow up/slow downs with isometric pauses during the up phaseNotesSpeed
 NotesSpeed
 Notes
Notes Notes
Notes Notes
Notes