Mastering the Deadlift: Part I
by Eric Cressey
Tech note: This article contains videos delivered in Flash. You will
need the latest version of the Flash Player (at least version 7) to
view them. If you cannot see the videos, please CLICK HERE to download and install the latest player now. It is free, quick, and easy.
Everyone knows how valuable the deadlift can be, but not everyone does
it regularly. Yeah, a few people are just plain lazy, but many are
simply afraid. They've never been taught to do it safely and are
concerned that they'll get hurt if they push the weights without
assurance that their form is on-point. With that in mind,
this series was born. Here I'll give you a full-on analysis of a good
deadlift, examples of every single deadlift debacle you'll see in the
gym, and provide you with plenty of deadlift variations you can
incorporate into your training for longstanding success with this
fantastic movement. First, though, we need to cover eight prerequisite issues to set the stage.
Issue #1: Competition Deadlifts Don't
use videos of deadlifts from powerlifting competitions as a standard
for teaching exercises. For those who haven't done a powerlifting meet,
let's just say that you generally aren't feeling like a million bucks
when pulling time comes around.

A
meet might start at 9AM, at which time you need to hit three heavy
squat attempts after an extensive warm-up. A few hours later, you hit
three heavy bench attempts, after which your back is so damn tight from
arching that you'd think you'd just left a yoga class. (Fortunately,
you're surrounded by strong and predominantly fat guys to convince you
otherwise.) You knock back some caffeine, warm up, chalk up,
snort a little ammonia, and then go out and dip, grip, and rip. The
less you think, the better. So, logically, you aren't going to see the
most picture-perfect form. It's like analyzing running mechanics on the
marathoner who has heat stroke and is trying to crawl across the finish
line.
Issue #2: Categorizing Deadlift Candidates When
I put deadlifts and their variations into programs, I can easily
stratify clients and athletes into one of three categories:
Category 1: Weekend warriors who deadlift to improve functional capacity and correct or prevent imbalances.
Category 2: Athletes who deadlift to improve performance and bulletproof themselves against injury.
Category 3: Powerlifters who deadlift to get better at deadlifting.
Weekend warriors need not apply. Logically,
I'm willing to take more chances in category #3 than I am in #2, and
certainly #1. Weekend warriors don't get aggressive loading parameters
(singles over 90%). And while athletes might get to pull heavy singles,
they only get to do so in a controlled environment (elevated trap bar
deadlifts, pulls against chains). A veteran athlete would
blur the line between #1 and #2, and a more resilient up-and-coming
athlete would be more of a "true" #2.
Issue #3: The Perfect Deadlift? There's
no one perfect way to deadlift. Sure, there are certain things — lumbar
flexion and hyperextension, and flexed-elbow lifting, for instance —
that you never want to see on a pull, but that's not to say that there
aren't going to be individual biomechanical differences among lifters.
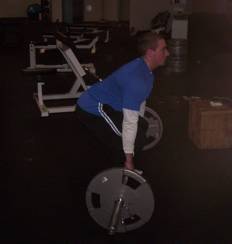
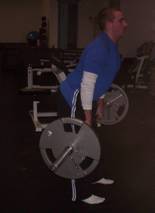
Specifically, I'm referring to torso and limb lengths. Those
with longer torsos and shorter legs will tend to pull with the hips
slightly lower — basically a bit more of a squat:
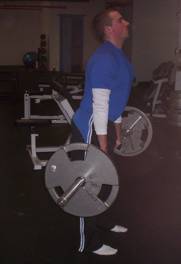
Those with longer limbs and shorter torsos will pull with the hips slightly higher:
The important thing is that the spine is neutral in both situations and the elbows are taut. Injury
histories and functional limitations also warrant consideration here.
An athlete with very poor ankle mobility (mainly a lack of dorsiflexion
ROM or range of motion) will generally try to pull with the hips higher
or compensate by externally rotating his feet significantly. Those with
a history of anterior knee pain will also gravitate toward the
hips-higher set-up because it takes some of the stress off the knee. I'm
not saying that either of these adjustments are correct; I'm just
pointing out that previous history of injury and functional limitations
can alter someone's "natural" style. You need to address the issue
before you can truly determine whether you're better off with the hips
higher or lower.
Issue #4: Sumo vs. Conventional I'm
often asked by people whether I think they'd be smarter to switch to
sumo-style pulling (or give it up). My personal philosophy is that you
should be able to do both safely if you're adequately prepared,
although there will often be a substantial difference between your
strength on the two. As an example, I might be good for 650
conventional, but only 600 sumo.

The Sumo Deadlift From
a strength versus muscular development standpoint, sumo pulling
decreases range of motion, so you theoretically have the potential to
move more weight. However, less range of motion isn't necessarily ideal
from a hypertrophy standpoint. Still, you're going to get better
overall lower body development from doing both. From an injury
prevention standpoint, sumo pulling can really beat up your hips if you
aren't careful with how you program. Some people simply aren't ready
for wide-stance anything. It's not uncommon to see anterior joint
capsule irritation and even strained adductors. A pair of
squat briefs can alleviate some of these problems, but it's really just
a band-aid on an open wound. If you're going to squat or deadlift wide,
you really need to prioritize hip mobility. Lastly, and most
significantly, sumo pulling tends to be the deadlift of choice for me
when working with someone with longer femurs. With conventional
pulling, they tend to struggle with "clearing" the knees on both the
concentric and eccentric phases simply because the femur is so damn
long. With these individuals, I'll cycle sumo pulling with
rack pulls from just above the kneecaps and trap bar deadlifts to
ensure that they're developing in both positions and all ranges of
motion.

The Trap Bar Deadlift Sumo
pulling can also be a great substitute in those with chronic knee pain,
but it really depends on the specific situation, so a generalized
recommendation is tough to make.
Issue #5: The Thoracic Rounding Issue My 635 deadlift video from Are You Doing Stupid Stuff in the Gym? once again stirred up the question of whether rounding is okay. Here's the video one more time:
First,
remember that I'm a member of category #3: I deadlift to get better at
deadlifting, not basketball, bocce ball, or pocket pinball. Second,
and more importantly, people need to understand the difference between
thoracic flexion and lumbar flexion. The secret with respect to
rounding on maximal pulls is to get it in the right places. The best
pullers get rounding in the thoracic region (if it even occurs), not
the lumbar spine. We buttress against shear stress more
effectively at the thoracic spine (designed for more ROM) than we do at
the lumbar spine (less ROM). The problem is that beginners don't have
the motor control to tell the difference.
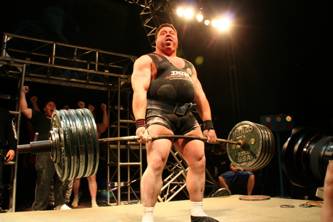
If you need
proof, take a look at Olexsandr Kutcher (near-800 pound deadlift at
165-181). He's very thin at the lumbar erectors, but thick at the
thoracic erectors. This hypertrophy llocalizes because that's where his
body is working hardest. My back isn't as big as Kutcher's, but in
terms of proportionate structure, it's a complete replica. (My name
isn't nearly as cool either, unfortunately.)

Issue #6: Deadlifts Aren't Olympic Lifts When
an Olympic lifter lifts a bar from the floor in preparation for a clean
or snatch attempt, his goal is to position the bar in the ideal spot to
set up the second pull (above the knees to the catch component). A
deadlift is just a first pull with terminal hip extension. The idea is
just to get the bar to the hips and stand upright with it. I've
never seen an Olympic lifter miss an attempt on the first pull; it
simply isn't the limiting factor in the strength curve. So the lifter
is always working with submaximal weights in that portion of the
movement.

When
you're working with submaximal weights, you have some wiggle room with
your set-up. Olympic lifters manipulate this to their advantage by
squatting a bit deeper on their first pull. Deadlifters, on the
other hand, need to put everything they've got into the first pull, so
it's important to go directly to the most strength-conducive position
from the get-go. Lastly, let's not forget the difference in
footwear between the two types of lifters. Olympic lifters wear shoes
with marked heel elevation, while deadlifters want to keep their heels
as close to the floor as possible. Which brings me to...
Issue #7: Footwear "Thou
shalt not deadlift in cross-trainers" is actually the first commandment
in the powerlifter's bible. Rather than list all the shoes that aren't
appropriate for pulling, let's just say that you have four options:
1. Go barefoot
2. Wear Chuck Taylors (Converse All-stars)
3. Wear wrestling shoes
4. Wear ballet slippers

The author's favorite pair of Chucks... Okay, just kidding! I'm
a huge proponent of Nike Frees and Reebok Travel Trainers, but I think
that both of them still have too much heel lift for deadlifts.
Issue #8: Chalk You
should never miss a deadlift due to sweaty hands. If you don't train at
a gym that allows chalk, I'd recommend finding a new gym, or at the
very least sneaking some in.

Invisible
liquid chalk is available, but I don't like it nearly as much as the
real thing. For a list of more hardcore gyms near you that would allow
chalk, check out Powerlifting Watch's Gym Database. I
don't recommend straps unless you're using a snatch grip and they're
absolutely necessary. Gloves will actually make things worse, but I've
found that Lynx Grips can help the cause, especially in females who are
concerned about avoiding calluses.

Wrap-up Ponder
these eight prerequisites for a few days. We'll be back with enough
deadlift technique videos to satisfy your pulling fixation for years to
come!
About the Author
Eric
Cressey is a much sought-after Boston-based strength and conditioning
coach who has worked with athletes of all levels, from youth sports to
the professional and Olympic levels. Feel to contact him and sign up
for his free newsletter at www.EricCressey.com, and check out his daily updates at www.EricCressey.Blogspot.com.
Along with Mike Robertson, Eric co-produced
Magnificent Mobility and the
Building the Efficient Athlete 8-DVD set. He is also the author of
The Ultimate Off-Season Training Manual. All three are available through the T-Nation store.


 Here's another bad lockout (leaning back/hyperextension):
  Now, a good lockout (glutes tight and shoulders back; standing tall, but not shrugged up):
 Step 7 As
 Many
Many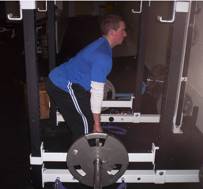
 The answer is "B"
  2. Play around with different starting positions: mid-shin, just below the kneecap, and just above the kneecap.